Tricks N Trolls

Knowledge has no END only starting

Blog Tools

Personlize your blog like a pro, just small modifications. learn here

Blogging

You know ? you to can change your blog like Pro. want to know how ??

Internet Tips

Day by Phising attacks, Malware are everywhere. How to be safe browsing ???

Deals n Offers

Do you need Everything ? Everyday there is a offer i will bring upto you. stay amazed

Top method to remove Write protection

Top Method To Remove Write Protection From Your Pen Drives / Memory Sticks


In most of the USB based flash/pen drives, write protection is provided via the small notch. First of all look for it in sides of your drive. It’s even marked with lock/unlock symbol. Move/slide the notch to unlock position (means releasing write protection) before you perform any file operations in your drive such as copy/paste/format etc. After that you can slide back the notch to lock position safely.

But many of the pen drives don’t provide hardware lock/notch for write protection. Instead they back it up by means of some software/tool. From there you can change the write protection lock/unlock option. Refer to your pen drive’s manual for more details in this regard as different pendrive have diferent ways to to unlock them or otherwise you can also take help of some tools to unlock them.

Just download this file Click Here

All you need to Just only click, Only one click. Your problem is solved. And a Great application is created by Askvirus

Screen Recorder for PC


Screen Recorder for PC


Welcome to My Learned Tricks,

Today I am introducing one useful this application to you


Actually your at  PC and you found something so you want to share with your friends that the way of process you are finding something special. so how it's possible ? YeP it's possible.there is way, while doing work in your pc, you can record your process on PC and share with your friends. there  is one software available for this that name is screen recorder for PC.

Free Screen Video Recorder is a compact, yet full-featured screen video recorder and screenshot capture tool that allows you to easily record screen activities and capture anything on the screen including windows, objects, menus, full screen and rectangular regions.

You can choose to save captures to file, clipboard or print them out directly from the program window.

Product details:


- Record screen activities including onscreen changes, speech from microphone, mouse movements
- Capture multiple windows and objects including multi-level menus
- Resize, cropp and rotate output images
- Record your screen video to AVI files
- Highlight your cursor path for clarity
- Record video with sound (from the microphone)
- Save in BMP, JPEG, GIF, TGA or PNG formats
- Run when Windows starts (optional)
Free Screen Video Recorder contains no spyware or adware. It's clearly free and absolutely safe to install and run.

DVDVideoSoft's products are freeware. In order to maintain product development and provide you with high-quality software, DVDVideoSoft may bundle links to other websites and third-party apps installations including toolbars in its products. Every time DVDVideoSoft products are installed, you have an obvious option to accept or opt-out of such installations.


Windows 10, 8, 7, Vista, XP SP3

You know you can recorder your PC screen while you doing anything, and that to be share on any where. That is screen Recorder like in your phone i've checked many screen recorders but all are to much in size and kind of hard things to do. now am introducing to one simple operation recorder, no need to find more & more options and simple in size 

Key features include:

1. Capture anything you see on screen.
2. Multiple audio mode support.
3. Screen recording share support.
4. Overall, Apowersoft Free Screen Recorder is a great screen recording tool that is simple to use and has a couple of useful features such as the screenshot capture tool and the ability to choose the audio input. The application has a really easy to use interface and even novice users will be able to get to grips with the layout and functions.

To Download Click Here

EEE 4-1 Lab Manuals


Power system Lab Manual. 

1-6 Experiments     PDF Download
Total Experiment    PDF Download

MPMC Lab Manual

1- 5 Experiments     PDF Download
5-12 Experiments    PDF Download

Simulation All Experiments

All Experiments      PDF Download


Any Doubts, Free to comment.

CLEAN UP IOS MEMORY (RAM) COMPLETELY

CLEAN UP IOS MEMORY (RAM) COMPLETELY


The iOS user interface is based on the concept of direct manipulation, using multi-touch gestures. Interface control elements consist of sliders, switches, and buttons. Interaction with the OS includes gestures such as swipetappinch, and reverse pinch, all of which have specific definitions within the context of the iOS operating system and its multi-touch interface. Intern alaccelerometers are used by some applications to respond to shaking the device (one common result is the undo command) or rotating it in three dimensions (one common result is switching from portrait to landscape mode).

iOS shares with OS X some frameworks such as Core Foundation and Foundation Kit; however, its UI toolkit is Cocoa Touch rather than OS X's Cocoa, so that it provides the UIKit framework rather than the AppKit framework. It is therefore not compatible with OS X for applications. Also while iOS also shares the Darwin foundation with OS X, Unix-like shell access is not available for users and restricted for apps, making iOS not fully Unix-compatible either.


It is the memory (RAM) who determines the speed and reliability our Computer or Phone. In Computers, or in Windows we have a Task Manager for cleaning up the memory and processes. In Android also there are a lot of ways for cleaning up the memory.
iOS is very clever in handling memory and it balances the load regularly by cleaning the RAM automatically. But, sometimes if we want to clear the memory, what we will do ? Most people willDouble Tap the Home button and Swipe up the listed Apps.
But it is not a method for performing a complete clean operation! To completely clean the RAM manually, do the following steps:
  • Press and Hold the Power Button until the slide to power off screen appear
  • Don’t slide, it will turn your phone off
 
  • Instead, Press and Hold the Home button
  • After a while, it will reset the RAM and Homescreen will appear
All your Apps that were being worked during this proccess will be still there. But you can see that if you open them, a fresh open will occur! It means the Device is like a newly restarted one :)

Share files ti Ios to other


SHARE ANY FILES WITH IPHONE TO ANY DEVICE WITHOUT JAILBREAK!


File transfer using iPhone devices to non-iOS devices been not possible for past years. Some made it possible with Jailbreaking the phone, I don’t know if jailbreak is better option or not. Anyway, today I will tell you about an App that let transfer your files to any devices without Jailbreaking your iPhone.

Transfer-data-between-iOS-and-androidThe app is called Xender, the most used file transfer app used in Android phones. Now, it has come to iOS also! Here, I will describe how to Send & Receive files (including Photos, Music, Documents etc.)
  • First of all, Download the App from the link given at the bottom of this post
  • Launch Xender app on android, Tap Connect Phone and Tap Create Group.
  • Next, turn on the WiFi feature on the iPhone and connect to the android hotspot device

10882339_853983014623460_9173055623550768845_n
  • Now you’ve connected to the Group created and you can transfer the Music, Photos etc.
Download the app from the following Link:
:)

UPGRADING ANDROID TO IOS ??

UPGRADING ANDROID TO IOS ?? IT IS SO EASY..


Recently, Apple has announced the release of the new update for their mobile operating system, iOS. The new update, iOS 9 is to be released on this fall. We’ve already discussed the features of the upcoming update in the following post:
Now, Let us digg deep into one of the new features of iOS 9. The new OS comes with an option for users to migrate from Android to iOS! Any user who wish to move from their Android phone can use this option to keep their Data from being lost while moving to a new iDevice!

android-migration
For this, you’ll have to wait until the release of iOS 9, which will happen in the coming fall (september – october), from that day onward, you’ll have an App in the Google Play Store named “Move to iOS” which will lead you to the migration process from Android to iPhone/iPad!
Here are the steps to switch from Android to iOS wirelessly:
  • Download the “Move to iOS” app from Google Play Store in your Android Device
  • Open the Move to iOS app from your Android device (a working internet connection is required)
  • Link the app with your Apple ID to connect the phone to your new iPhone/iPad
  • Select the things you want to transfer to your iPhone/iPad (you can transfer yourappscontactsmessage historycamera photos and videosweb bookmarksmail accountscalendarswallpaper, and DRM-free songs and books)
  • That’s it! Now gete ready to transfer all the selected items into your new iPhone/iPad
NoteTransferring Apps means it will help you rebuild your app library. Any free apps you used — like Facebook and Twitter — are suggested for download from the App Store. And your paid apps are added to your iTunes Wish List
move-to-ios-from-android
 
Also, you can recycle your old android phone for free at any Apple Store. So those who wish to migrate from Android to iOS, wait until this fall…

How to display the battery percentage in status bar


First of all, Welcome to My Learned Tricks blog.


It’s nice to be able to see how much battery life you have left in the status bar, but many people prefer to see it as a percentage rather than the “cup of water” method. You can do this from within the System UI Tuner that we enabled in the previous tip. Assuming it’s already enabled, just tap System UI Tuner from the main Settings page, followed by Show Embedded Battery Percentage. Doing so will toggle the feature on.You will see the battery % in notification bar


In the early days of Android it was a real chore to reach the end of a busy day with battery life left. That's improved over time but it can still sometimes be difficult to get through a busy day without running the battery dry. Frequent business travelers in particular know how important it is to stretch the battery, as traveling can be hard on power usage. The tips in this collection can go a long way to help get through those days and safely back to the phone charger.
Many of these tips are simply common sense, but they are worth mentioning just in case. Plus, if they aren't mentioned some will wonder why they were overlooked.
In later versions of Android there is a nice power usage graph as shown above that is accessible via settings. It can help identify culprits that are draining the battery excessively should you notice the remaining battery seems too low.
These tips are specifically for Android phones, but most other phones likely have similar settings that can be tweaked for similar battery gain.

How to customize tile in Notification bar


How to customize the Quick Settings menu

Once you've installed a custom launcher, you can delve into the wonderful world of icon packs. Icon packs replace the current app icons on your phone with new ones. You can choose them individually from thousands of different options or you can apply an icon pack theme to give everything a streamlined look


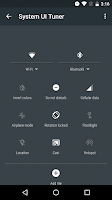
The Quick Settings menu that appears when you swipe down with two fingers from the top of the display is awesome, but it’s even better when you customize it. Thankfully, Google finally added the ability to do so with Marshmallow, but you would never know how unless you know the trick to unlocking the System UI Tuner.
To do this, just tap and hold the Settings icon in the top-right corner of the Quick Settings menu. After a few seconds, lift your finger and you will see a popup at the bottom telling you that the System UI Tuner has been added to your Settings.
Now, tap on System UI Tuner from the main Settings page (it should be at the bottom) and tap on Quick Settings. From here, you can tap and hold any of the tiles to move them around or remove them from the menu. There is also an Add Tiles option if you want to add tiles that you may have previously removed.

Icon packs are freely available in the Play Store and work with most major custom Android launchers. Just take a look at how many icons each pack contains, because there's nothing more annoying than adding an icon pack only to find half a dozen of your favorite apps have been left off the list.

Did you know it’s not actually necessary to unlock your smartphone to view or launch your favorite apps? Cover is an intelligent lock screen app that learns from you to give you the apps you need when you need them. Take a look at how Cover works in the video below.

For me, the best way to customize a phone is with Xposed Framework. With Xposed modules, we can completely customize our smartphone from the inside out, adding or removing software features not useful to us. Where phones traditionally come with a whole stack or pre-cooked features, whether you want them or not, Xposed lets you add or subtract them based on what you actually want your phone to do.