Tricks N Trolls

Knowledge has no END only starting

Blog Tools

Personlize your blog like a pro, just small modifications. learn here

Blogging

You know ? you to can change your blog like Pro. want to know how ??

Internet Tips

Day by Phising attacks, Malware are everywhere. How to be safe browsing ???

Deals n Offers

Do you need Everything ? Everyday there is a offer i will bring upto you. stay amazed

Showing posts with label Security for PC. Show all posts

How to find ORIGINAL DOWNLOAD LINK in anywebsite

Hello everyone, today am going to tell you about Internet trick that will able to tell you, which is original download link to download any content. 

  Basically everyone surfing, downloading mp3, and videos, torrent...etc. while downloading mp3 songs those website contains so many download buttons. When you press wrong one, some wrong applications will be downloaded to our computer with same name. that could be be the malware, those can dangerous to PC also. 

All you need is having little bit knowledge about file hosting servers


When you are downloading any file, like you want to download mp3 that could be mp3 or zip or rar. not any .exe


1.See there is a separate border for some kind of Ads leave those 


2.Main thing place your cursor at download link. it will show preview at left bottom side

2.1 In that preview name, any of place in that if you find http://****adsservice**** like this address, leave it


3.Example : If you are downloading files from server like ziddu.com, that cursor preview must be staring from www.ziddu.com or related to ziddu.com,


3.1 In www.ziddu.com when you click on 1st time it will redirected to the pop-up ad. For this you need to Double click the download button to save time

4.Some websites may play those songs or videos instead of giving download link

4.1 For those Click on Play button and 

4.2 Right click on that player then you will find save as or save video as click it

4.3 It will save that file as you want( you can change that while saving file)

5. While downloading torrents your aim must be to download .torrent only. don't download any other looking like download, Fast download, Speed download.

 5.1 For any torrent downloading the perfect method is to use MAGNET TOOL. torrent client has facility of download torrent from online with out downloading it


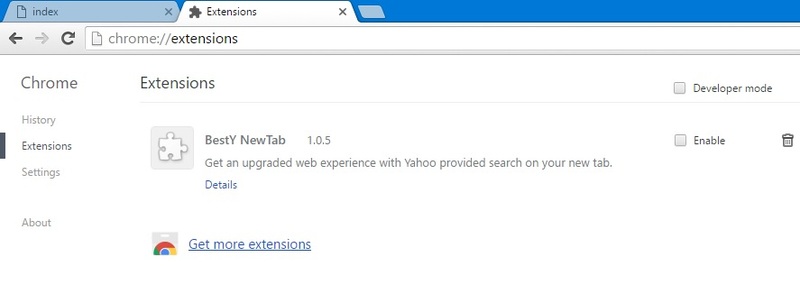
Those unwanted application will effect the Chrome browser(changing homepage, search engine...etc).
Top method to remove SHORTCUT VIRUS

Top method to remove SHORTCUT VIRUS

First of all, Welcome to My Learned Tricks blog.

Well, it’s been a long time since we discussed about virus removal. I wasn’t able to be active on my site for a long time due to some other works, now I am happy to be live again! Today, we will discuss about the removal of the most popular and problematic virus, the Shortcut Virus!
In this article, I will be explaining two different kinds of Shortcut Viruses and the ways to deal with them. It’s not very easy to clean them permanently since most Anti-Virus applications fail to detect them. Mostly, these viruses are spread through Pendrives.


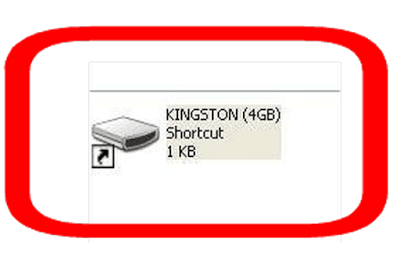
Above screenshot is of a kind of Shortcut Virus that is spread through Pendrives. Here the entire files in the Pendrive are moved into other folder that has no name (follow this tutorial to know how to create a folder without name) and kept super hidden in the Pendrive itself! When we open the shortcut, it will open that folder but, along with it a strange application will also execute and by that time, virus will be injected to your system!

Most users will just try to open this shortcut and that’s how the virus is spread to the system. All we have to do is the following steps:
First of all, just delete that Shortcut! It’s the main link that helps to execute the virus (Don’t worry, your’s files won’t be lost. They are all safe)
Now, if the Virus is already in your system, then the Shortcut will reappear! If it happens, then do the next step


Open Task Manager by Right Clicking on the taskbar
Now, in Details tab (Windows 7 & Older, Process tab), search for any of the following processes (in some cases, you may need to click Show process from all users)
taskhost.exe
 (it is not a virus, it is a system file, but helps spread virus sometimes)
process with meaningless names like: cbxghsrjgbdds.exe, odwcamszas.exe etc.
End all such processes by selecting them and clicking End Process Tree (or End Task) button
Now, try again to delete that shortcut. It won’t reappear. Then we have to recover our files that the virus took!
For that, open your pendrive and then open Folder Options
Windows 8/later: in the Ribbon, View tab -> Options.
Windows 7 users: Organize Folder -> Folder Options.
Windows XP: View -> Folder Options


In Folder Options, go to View tab and uncheck “Show hidden files, folders and drives” and uncheck “Hide protected operating system files (Recommended)“


There you can see a hidden folder with an icon of Pendrive, but it will not have any name. Open that folder, there you can find all your files
Move all that files back into the root folder of pendrive except a file with a long name (it is a virus file, ignore it)
Now delete that unnamed folder. That’s it! one more task remaining to completely remove the shortcut virus from your computer


Even though you performed all above steps, when you restart your system, the virus will again come back! Following steps should be done before you restart to completely remove the virus:
Remove all the processes I mentioned above from the Startup lists:


      SEE VIDEO HERE 

Top method to remove Write protection

Top Method To Remove Write Protection From Your Pen Drives / Memory Sticks


In most of the USB based flash/pen drives, write protection is provided via the small notch. First of all look for it in sides of your drive. It’s even marked with lock/unlock symbol. Move/slide the notch to unlock position (means releasing write protection) before you perform any file operations in your drive such as copy/paste/format etc. After that you can slide back the notch to lock position safely.

But many of the pen drives don’t provide hardware lock/notch for write protection. Instead they back it up by means of some software/tool. From there you can change the write protection lock/unlock option. Refer to your pen drive’s manual for more details in this regard as different pendrive have diferent ways to to unlock them or otherwise you can also take help of some tools to unlock them.

Just download this file Click Here

All you need to Just only click, Only one click. Your problem is solved. And a Great application is created by Askvirus

How to remove Google chrome virus

Are you facing problem with Google chrome 3rd party applications ?? 


Hello everybady, How is every one ?? Welcome to My Learned Tricks blog

Hi guys, how is everyone ??Do you know you can change fb theme in chrome ?? You van do many things in Google chrome. Yeah its good. What if that to be like bad ?? today i want to share another information about How to remove izzing, and worst search engines, Now a days Google Chrome is best browser to use everyone. Because it will be lite and efficient and also speed. why it is speed ? for google chrome it will use different processes in PC to overcame Hang and Lack. So many 3rd party Applications and Extensions to increase their PR Rating. Through Extensions only they are changing our browser settings. all you need is to keep an eye on extensions. All you need is just 10 mins times ;)

Now i will tell you how to overcame

You've 4 ways to overcame that problem.

1.Change simple settings in chrome

2.Remove user in settings

3.Delete Extensions

4.This will, when above 2 methods are work


1.Change simple settings

   For this thing you will need just basic stuff and basic knowledge. In chrome go to options tab in top right corner and click settings or options. That will take to you some window. You will find like History, Extensions, Settings, About...(etc)


With in it, go to settings you will have everything related your browser personification. you can find what ever you want.

     Startup settings: In this you can change while startup which page you want to open. Maximum problem is here only.
      Appearance settings: You can Enable Home button to reach any page instantly. this is the main thing that 3rd party application ruined our browsers
      Search settings: While searching anything in address bar their will be instant google search to search very quickly and getting google recommendations. the 3rd party application disable google instant search and they are using their own search engines to increase their PR Ratings
      People (user) settings: Different people will have different themes bookmarks and suggestions. this will allow you change your pattern style
      Default browser: This is allow to your browser if it is Redirecting from any application    


2.Remove user in settings

    That you are making your browser as a GAJINI. It will lost everything and it will be like new browser, i mean the first time using. Just go to Settings and you are redirected to another page there also another setting will be there with in it you will find user setting tab. Click on user(then only Delete option will highlight. click Delete user. There you go, You've Made it


3.Extensions:

  90% of changes in chrome are only made through extensions only. Extensions are used to personalize you chrome, now that will be using for their purpose ony. If you have look at these Extensions then, you can understand everything.

MAIN STEP IS INCUDED HERE. Instead of any applications they are using simple Extensions. you can find that extension here


 If you are not able to find is it useful or not. just take google help.

4.This will use, when above 2 methods are not work


 And What if You are still facing problem.? There am telling you another method about completely removing. In this method we will change that path of chrome browser.


That above pic you will find that Target place, that will tell you from which place it is starting. if you find anything like me in the pic. Just remove all the text after from CHROME.EXE.


Click Apply, Then OK

BBBBOOOOOMMMM You've successfully completed Your Chorme transformation. Nothing will get you..


USB Disk Security


First of all, Welcome to My Learned Tricks blog.


Free USB Disk Security is a small, free app that claims tokeep your pendrives and USB disks safe and secure.
On first looks, it's a decent app. The interface is simple and clean, although we found it annoying that
although the app creates a shortcut icon for you, you can't actually access Free USB Disk Security with it - you need to click on the Free USB Disk Security icon in the notification area in the taskbar to see its options and open the main interface.
Free USB Disk Security claims to offer two main USB tools - a shield, to protect you from incoming threats, and a scan, to scan pendrives once they are inserted. From the main interface, you'll also see an option to repair your system (which are just a selection of basic tools already provided by Windows). The home button provides an overview of the app's services.
In theory, Free USB Disk Security is a great idea and an excellent free tool, but in reality it's very, very difficult to tell if it's doing anything useful. When we did scan, it was extremely quick - to the extent that we weren't sure if it had even scanned. As for the monitoring, Free USB Disk Security claims the protection is real time, but when we inserted a USB stick, it didn't even tell us it had registered the event.


Description:
USB Disk Security is the best software to block threats that can damage your PC or compromise your personal information via USB storage.


Features:
* Block known and unknown threats from removable media
* Free for personal use
* Prevent unauthorized persons from stealing your data
* Compatible with other security software
* Compatible with all popular Windows platforms
* Fastest and lightest security software
* Best solution to protect offline computer


Requirements:
OS: Windows 2K / XP / Vista / Vista 64 bit / 7 / 7 64 bit / 8 / 8 64 bit / 2003


What's New in This Release?
* Added simplified Chinese
* Improved the detection of USB storage when PC had false USB drive.

HomePage


To Download: ClickHere

Remove Write-Protection

Top 6 Methods To Remove Write Protection From Your Pen Drives / Memory Sticks


In most of the USB based flash/pen drives, write protection is provided via the small notch. First of all look for it in sides of your drive. It’s even marked with lock/unlock symbol. Move/slide the notch to unlock position (means releasing write protection) before you perform any file operations in your drive such as copy/paste/format etc. After that you can slide back the notch to lock position safely.

But many of the pen drives don’t provide hardware lock/notch for write protection. Instead they back it up by means of some software/tool. From there you can change the write protection lock/unlock option. Refer to your pen drive’s manual for more details in this regard as different pendrive have diferent ways to to unlock them or otherwise you can also take help of some tools to unlock them.

Best Methods To Remove Write Protection From Your Memory Sticks / Pen Drives Goes here (ENJOY AND POST FEEDBACKS TOO)

METHOD #6 is the best and quick solution by www.askvirus.com 

METHOD #1 

Open Registry editor of your PC
 For this you should type command “regedit” on run.
Successively navigate to following linkHKEY_LOCAL_MACHINE\SYSTEM\Currentcontrolset\control\storatedevicepolicies( Note: if you can’t find ” storatedevicepolicies ” after “control” folder then you need to create it. For that follow instructions       mentioned below )
Open a new note pad file.
Copy this
cd\reg add “HKLM\System\CurrentControlSet\Control\StorageDevicePolicies” /t Reg_dword /v
WriteProtect /f /d 0
save it as DISABLEWP.BAT
Then copy it to start up folder.
 In right side u will be getting writeprotect option, just right click that and modify the hexadecimal value from 1 to 0
Restart your PC and enjoy!!!!
( Still having problem???   Don’t worry try other methods below )

METHOD #2
If you have transcend pen drive infected by 9u.exe which is a write protect virus then the following works like a charm:
1) Download JetFlash online recovery from:
www.transcendusa.com/Support/DLCenter/Software/OnLineRecovery.exe
2) Run the program
3) Specify the capacity of your drive eg.512 MB, 1 GB …..etc
4) Choose “repair and erase all data” OR ” repair and keep existing data”
5) Progress bar starts…….completes
6) Notification appears —” format complete”
7) Unplug and plug your drive and …..presto

enjoy!!!!

( Still having problem ?   Don’t worry try other methods below )


Method #3 

1. Start > Run  -> type “CMD” and press enter
2. type< diskpart
3. type< list volume
4. type< select volume # (# is the number of the USB HDD you’ve pluged in)
5. type< attributes disk clear readonly

(If you need help while typing commands then type “HELP FORMAT” on command prompt)


METHOD #4 

There are a series of options in the Group Policy Object Editor that deal with read/write permissions on hard drives and removable media.  I basically changed their individual settings from “Not configured” to “Disabled”.

Start -> Run… -> gpedit.msc -> OK
Computer Configuration -> Administrative Templates -> System -> Removable Storage Access

In here I disabled all of the “Deny read access/write access” options; you may only want to disable the ones relating directly to the type of media that you want to access.
T\Here are the ones I changed:

Removable Disks:  Deny execute access
Removable Disks:  Deny read access
Removable Disks:  Deny write access

Double-click each one and select the ‘Disabled‘ radio button.

Do the same as above, except the first step is “User Configuration” instead of “Computer Configuration”

(Best result if you try both method #1 and method #4 together)

METHOD #5


This is best and simple method, all you need to download ThisFile. and open what type you want..


you done...enjoy!!!!


( Still having problem ?   Don’t worry try other methods below )

METHOD #6


As said in previous this is also best method, all you need is just click, only clik. this software id created by www.askvirus.com.


Open ThisFile here


you done...ENJOY!!!!

Fix shortcut Problem


First of all, Welcome to My Learned Tricks blog.

Well, it’s been a long time since we discussed about virus removal. I wasn’t able to be active on my site for a long time due to some other works, now I am happy to be live again! Today, we will discuss about the removal of the most popular and problematic virus, the Shortcut Virus!
In this article, I will be explaining two different kinds of Shortcut Viruses and the ways to deal with them. It’s not very easy to clean them permanently since most Anti-Virus applications fail to detect them. Mostly, these viruses are spread through Pendrives.


Above screenshot is of a kind of Shortcut Virus that is spread through Pendrives. Here the entire files in the Pendrive are moved into other folder that has no name (follow this tutorial to know how to create a folder without name) and kept super hidden in the Pendrive itself! When we open the shortcut, it will open that folder but, along with it a strange application will also execute and by that time, virus will be injected to your system!

Most users will just try to open this shortcut and that’s how the virus is spread to the system. All we have to do is the following steps:
  • First of all, just delete that Shortcut! It’s the main link that helps to execute the virus (Don’t worry, your’s files won’t be lost. They are all safe)
  • Now, if the Virus is already in your system, then the Shortcut will reappear! If it happens, then do the next step
  • Open Task Manager by Right Clicking on the taskbar
  • Now, in Details tab (Windows 7 & Older, Process tab), search for any of the following processes (in some cases, you may need to click Show process from all users)
taskhost.exe
 (it is not a virus, it is a system file, but helps spread virus sometimes)
process with meaningless names like: cbxghsrjgbdds.exe, odwcamszas.exe etc.
  • End all such processes by selecting them and clicking End Process Tree (or End Task) button
  • Now, try again to delete that shortcut. It won’t reappear. Then we have to recover our files that the virus took!
  • For that, open your pendrive and then open Folder Options
Windows 8/later: in the Ribbon, View tab -> Options.
Windows 7 users: Organize Folder -> Folder Options.
Windows XP: View -> Folder Options


  • In Folder Options, go to View tab and uncheck “Show hidden files, folders and drives” and uncheck “Hide protected operating system files (Recommended)

  • There you can see a hidden folder with an icon of Pendrive, but it will not have any name. Open that folder, there you can find all your files
  • Move all that files back into the root folder of pendrive except a file with a long name (it is a virus file, ignore it)
  • Now delete that unnamed folder. That’s it! one more task remaining to completely remove the shortcut virus from your computer
Even though you performed all above steps, when you restart your system, the virus will again come back! Following steps should be done before you restart to completely remove the virus:
  • Remove all the processes I mentioned above from the Startup lists: